Aa we are growing in the Digital world, email is core part of the business and a critical part of unified communication tool. At the same time, Attacker is a great challenge for us therefore we required a system which protect the email communication from the attacher. From phishing scam, spoofed email/message, spamming, attackers are constantly trying to impersonate trusted senders. We have three powerful tools (SPF, DKIM & Dmarc) to fight with them.
Here are the steps by steps guide how to implement in your domain.
1. SPF (Sender Policy Framework)
SPF is an email authentication slandered (Protocol) – that prevents email spoofing by verifying an email sender is authorised to send email behalf of our domain. We as a domain owner need to create a DNS TXT Records on domain management console like godaddy, Google, hostinger whatever is your domain provider. in that list the specific mail servers and IP addresses allowed to send emails from our domain. Each domain can have only one SPF record.
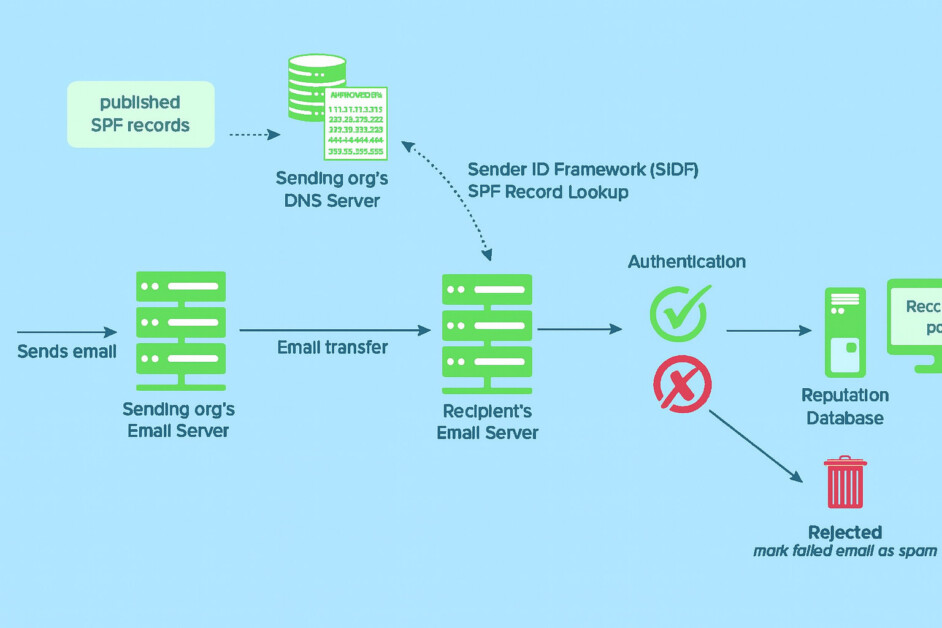
How SPF works?
- SPF Record Setup : The domain owner adds a TXT record in DNS listing all authorized mail servers (like Google Workspace). If you purchase domain from the google partner then no need to create SPF record as already created by default.
- Email Sent : When an email is sent from that domain, the receiving server checks the domain’s SPF record.
- Verification : It compares the sender’s IP address with the list of approved servers.
Result:
✅ Match: Email passes and is delivered.
❌ No Match: Email may be marked as spam, quarantined, or rejected.
If you use only Google Workspace services to send email, copy this line of text: v=spf1 include:_spf.google.com ~all, create a DNS TXT record at your domain management console. To check the validation pass whether SPF record has error or not, there is multiple free tools available online like Kitterman SPF Record Testing Tool.
SPF Record Format And Tags
An SPF record is a short line of text saved in your domain’s settings. It tells email systems which computers or servers are allowed to send emails using your domain name.
- Tags (Mechanisms): These are instructions like “allow this server” or “block that one.”
- Values: These are the actual IP addresses or domain names of the servers that are allowed to send your emails.
- SPF records always start with the v=spf1 tag.
- Include: tag in front of each sender domain (or IP address) in your SPF record. An SPF record can have up to 10 include: tags.
- The ~all tag tells receiving servers to mark messages as spam if they’re from servers that aren’t listed in the SPF record. Google recommends you use ~all in your SPF record.
Example :- v=spf1 include:_spf.google.com ~all
SPF Record Size Limits – Made Simple
- Each line in the record can be up to 255 characters long.
- The total size of the TXT file (including all lines) must be 512 bytes or less.
Why it matters: If your SPF record is too long because you added too many IPs or services, it might get truncated or ignored by email servers. That could lead to legitimate emails being marked as spam.
Standard SPF Records – for below senders you can customize as your requirement
| For these senders | Use this SPF record |
|---|---|
| Google Workspace (only) | v=spf1 include:_spf.google.com ~all |
| Google Workspace including Amazon | v=spf1 include:_spf.google.com include:amazonses.com ~all |
| Google Workspace including GoDaddy | v=spf1 include:_spf.google.com include:secureserver.net ~all |
| Google Workspace including Mailchimp | v=spf1 include:_spf.google.com include:servers.mcsv.net ~all |
| Google Workspace including Microsoft Office 365 | v=spf1 include:_spf.google.com include:spf.protection.outlook.com ~all |
| Google Workspace including Salesforce | v=spf1 include:_spf.google.com include:_spf.salesforce.com ~all |
| Google Workspace including Shopify | v=spf1 include:_spf.google.com include:shops.shopify.com ~all |
| Google Workspace including Zendesk | v=spf1 include:_spf.google.com include:mail.zendesk.com ~all |
| Amazon (only) | v=spf1 include:amazonses.com ~all |
| GoDaddy (only) | v=spf1 include:secureserver.net ~all |
| Mailchimp (only) | v=spf1 include:servers.mcsv.net ~all |
| Microsoft Office 365 (only) | v=spf1 include:spf.protection.outlook.com ~all |
| Salesforce (only) | v=spf1 include:_spf.salesforce.com ~all |
| Shopify (only) | v=spf1 include:shops.shopify.com ~all |
| Zendesk (only) | v=spf1 include:mail.zendesk.com ~all |
Add SPF Record to our domain
Important Note: Use your domain host’s help document to ass SPF record. Steps for adding records may vary depends on your domain host.
- Sign in to your domain registrar/provider/host your domain name.
- Go to the page where you can add/update DNS records for your domain.
- Add/update the SPF as TXT record as below information (Refer to your domain help documentation).
- If you use subdomains (like mail.yourdomain.com or shop.yourdomain.com), you need to create a separate SPF record for each one.
- If you’re setting up SPF for more than one domain (like yourdomain.com, digitalworld.com etc.), you need to repeat the setup steps for each one.
- Every domain must have its own SPF record, they don’t share.
Your May Also Like: Artificial Intelligence Unpacked
2. DKIM (DomainKeys Identified Mail)
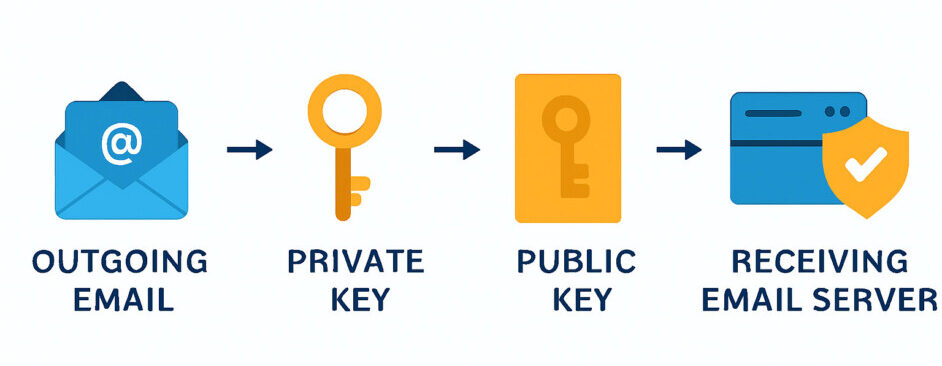
DKIM is a way to check if an email is really sent from the sender and hasn’t been changed on the way. It works like a digital lock and key. When you send an email, your system adds a special signature using a private key (like a secret stamp) and receiving email server looks up your public key in your domain’s DNS settings. It uses that public key to unlock and check the signature, If everything matches then email is confirmed as real and safe – not fake, not tampered. This helps stop email spoofing, phishing, and message tampering during delivery.
Want to pair this with a visual or animation for your blog or YouTube channel? I’d love to help you build it!
How Does DKIM Works?
- Signing Signature: When email sent from the sending server, the sending server use private key to generate digital signature and tag to email header.
- Publish Key: public key used for DKIM is saved in your domain’s DNS settings as a special TXT record. This lets email servers check if your message is real and hasn’t been changed.
- Verification: When the email reaches to recipient’s server, that server uses the public key from the DNS record to decrypt the signature to verify that it was signed by the correct private key or not. Check that the message content hasn’t been changed since it was signed.
- Authentication: If the DKIM signature matches, the email is approved as real, and the sender is confirmed to be genuine. It’s like checking a stamp to make sure the message came from the right sender and wasn’t changed.
How Does DKIM Generate?
Important: After you turn on Gmail services for your organization in Google Workspace, wait at least 24 to 72 hours before creating your DKIM key in the Admin console. If you try too early, it might show an error saying the DKIM record wasn’t created. If you are using other service provider please follow their help document.
Steps : To generate DKIM keys with Google Workspace Environment.
- Sign in Google Admin Console with Super Admin privileged or Gmail privileged Admin account.
- Go to Menu and then Apps > Google Workspace > Gmail.
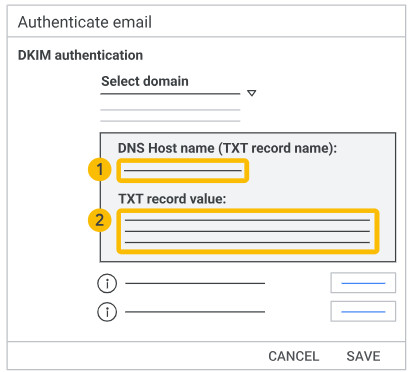
- Click at Authenticate email.
- In the Selected domain menu, select the domain where you want to set up DKIM.
- Click the Generate New Record button.
- In the Generate new record box, select your DKIM key settings.
DKIM key bit length options – 2048 bit- If your domain provider supports 2048-bit keys, select this option. Longer keys are more secure than shorter keys. If you previously used a 1024-bit key, you can switch to a 2048-bit key if your domain provider supports them. 1024 bit-If your domain host doesn’t support 2048-bit keys, select this option.
Prefix selector options:
- The default prefix selector is google. If you are using Google Workspace, this is the recommended option.
- If your domain already uses a DKIM key with the prefix google, enter a different prefix in this field. Read more about DKIM selectors.
7. Click Generate. On the Authenticate email page, the TXT record value is updated and this message appears: DKIM authentication settings updated.
Important: The Authenticate email page in your Google Admin console might continue to display this message for up to 48 hours: You must update the DNS records for this domain. If you’ve correctly added your DKIM key at your domain provider, you can ignore this message.
8. Copy the DKIM values shown in the Authenticate email window. You’ll add it at your domain provider in the next step:
Important: Do not click Start Authentication yet. You’ll do that later.
Add the DKIM key to your domain
Once you have generated your DKIM key pair, add the public DKIM key to your domain by creating a DKIM TXT record in your domain management page. you can take help from your domain service provider or refer your help document.
Steps to add DKIM key at your domain providers.
- Sign in to your domain host
- Go to the page where you update DNS TXT records for your domain.
- Add or update the TXT record with this information (refer to the documentation for your domain):
Note: Some domain providers limit TXT record length. If yours does, read Verify your domain provider’s TXT record character limits.
4. Save your changes.
5. If you use subdomains, check with your domain provider to find out how to add a TXT record for subdomains.
6. If you are setting up DKIM for more than one domain, complete these steps for each domain. You must get a unique DKIM key from the Admin Console for each domain.
Note: After adding a DKIM key, it can take up to 48 hours for DKIM authentication to start working
Turn on & verify DKIM
If you are using Google Workspace, follow the instructions in this section below or use your email service provider help document.
- Sign in with an administrator account to the Google Admin console.
- Go to Menu Apps > Google Workspace > Gmail. Requires having the Gmail Settings administrator privilege.
- Click Authenticate email.
- In the Selected domain menu, select the domain where you want to turn on DKIM.
- Click Start authentication. When DKIM setup is complete and working correctly, the status at the top of the page changes to: Authenticating email with DKIM.
Bingo! Now your email authentication has been started.
Why DKIM Is Important?
- Preventing Spoofing: DKIM helps protect your email by making sure only trusted servers can send messages using your domain name. This stops fake emails and keeps others from pretending to be you.
- Email Integrity: It checks that the email hasn’t been changed while traveling, making sure no one has secretly edited or messed with the message.
- Enhanced Deliverability: Using DKIM can help your emails reach inboxes instead of spam folders. It builds trust by showing that your messages are real and sent from your domain, which improves your email reputation.
3. Dmarc – Domain-based Message Authentication, Reporting & Conformance
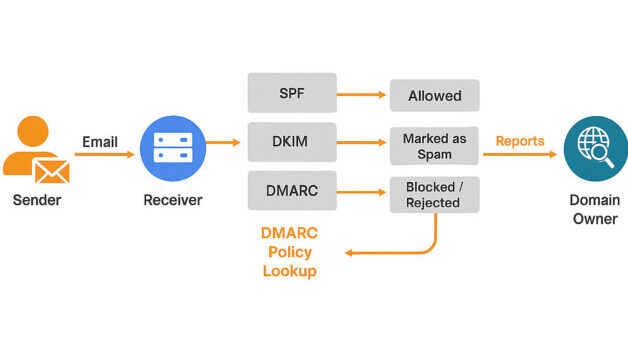
DMARC is a security tool for email that helps stop fake messages from using your domain name. It works with SPF and DKIM to check if the sender is real and trusted, helping block email scams like spoofing and phishing. DMARC adds extra protection by linking emails to the sender’s domain name (the “From” address), setting rules for what to do if an email fails authentication, and sending reports back to the domain owner. This helps spot and stop fake emails more easily.
How Does DMARC Works?
- Builds on SPF and DKIM: DMARC uses the existing email security tools – SPF and DKIM – to check if an email is really from the sender it claims to be. It adds an extra layer of protection by combining both checks to better block fake or harmful emails.
- Dmarc Policy: Domain owners add a DMARC record to their DNS settings. This record tells email servers what to do if a message fails SPF or DKIM checks – like whether to allow it, mark it as spam, or block it completely.
- Authentication: When an email arrives, the receiving server checks if it passes SPF and DKIM tests. Then it looks at the domain’s DMARC rules to decide if the email is safe or should be blocked or marked as spam.
- Action: Depending on the DMARC policy, the receiving server can:
- Deliver: the message normally.
- Quarantine: the message (e.g., send it to the spam folder).
- Reject: the message entirely.
- Reporting: The DMARC record can also ask email servers to send reports to the domain owner. These reports show which emails passed or failed security checks, and which domains are trying to send fake emails using the owner’s domain name. This helps monitor and improve email protection.
Generate Dmarc record for your domain.
Generating dmarc record is very simple, either you can go to at demarcian official website and follow the on screen steps to create Dmarc record for your domain in a minute. Below the sample of record.
Dmarc Record is: v=DMARC1; p=quarantine; rua=mailto:abc@yourdomain.com;
Record Type is: TXT
Target/Host/Location: _dmarc.yourdomain.com